How to Restring an Acoustic Guitar
 1. Place the guitar in a safe stable position, preferably in a neck cradle. Loosen the strings a good dozen turns or so. String winders are very helpful for this stage of the restring. Be prepared for the occasional string breakage that happens with the release of tension. Safety glasses are always a good idea or at least make sure not to have your eyes near the headstock when either tightening or releasing the tension on a string.
Some players refrain from loosening and replacing all the strings at once to avoid such a large change in tension against the neck. However if you do remove the strings, this is is a great opportunity to clean and oil the fretboard as well as the face of the guitar!
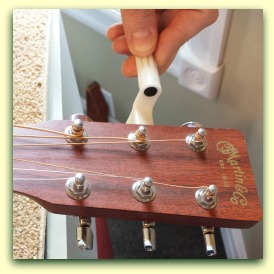
2. Once the tension is released on all the strings, remove the bridge pins. String winders have a slot in the tuner cup for this purpose. Pliers will work, but be very careful as any side pulling will break the pin and leave part of it in the guitar. If this happens, the broken piece must be pushed back up through the bridge pin hole from inside the guitar. Also, do not leverage any tool against the bridge face as it will dent the wood.
 3. Pull the strings free of the bridge pin holes and lay them clear of the face of the guitar. At this point, you may find that you did not loosen the string enough and a few more turns should do the trick. The smaller strings can sometimes cut into the bridge pin slot and be slightly lodged there. A gentle tugging should pull them free. If a string was broken, the ball at the end may still be lodged in the pin slot and can be pushed inward and retrieved through the sound hole.
 4. Unwind the dead strings one at a time from the machine head posts. Be careful when the string is finally pulled free of the post as it can either scratch the face of the headstock, or poke your finger. A sore finger tip is no fun to play a gig with. Wind up the strings and dispose of them properly. Make sure to get any pieces that may have landed on the floor as strings can wind around a vacuum power head rotor and are hard to remove. Take this time to clean the headstock face.
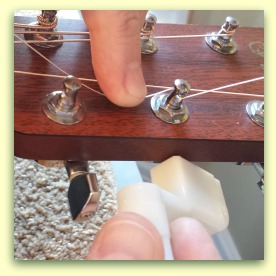
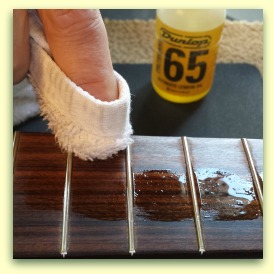 5. Use a dry soft cloth to rub fret oil or conditioner into the open grain of any non-finished fretboard. Oil from your fingers combines with the oxide that is created from strings breaking down and frets being debraded. This leaves a black substance that penetrates the fretboard and accumulates to the sides of the frets. A good strong rubbing of oil around every inch of the fretboard will release this dirt. Watch your cloth until a fresh oiled area of the cloth comes clean after rubbing. This means it is properly cleaned. Also be wary of poorly fretted guitars that may have sharp or lifted fret ends. Fret ends can cut you or tear your cleaning cloth. Some fretboards can be so dry of oil, that leaving some on the fretboard for a while can help before finally wiping all the excess away. Take care to not have oiled areas of the cloth wiping the face of guitar, especially if you have an open grained top.
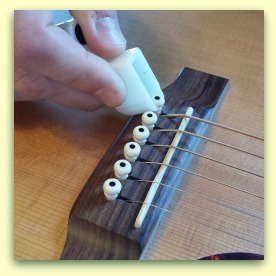
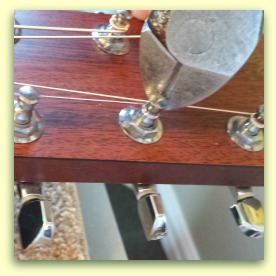
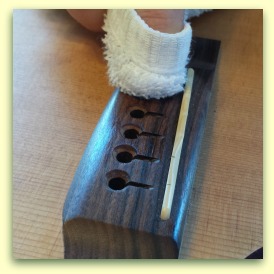 6. If the bridge saddle removes easily, do so and then oil the bridge the same way the fretboard was oiled. Saddles require less elbow grease as they don’t normally collect the dirt and oxide that fretboards do. To avoid getting oil on the guitar face, you can either use easy remove painters tape, or cut a shield from a thin plastic like a milk jug. If the top is finished and glossy, any oil that sticks there will easily remove with most guitar cleaners. I try to fold the cloth so the oiled part wipes the side of the bridge while the dry part rides on the guitar face. Be careful during this process if the top is open grain!
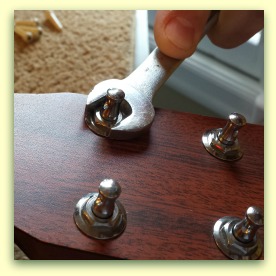 7. Before you being to put the strings back onto the guitar, make sure that the nuts that hold the machine heads secure to the headstock are securely tightened. Some machine heads do not have nuts so you can ignore this step. Loose nuts can be tightened with the appropriate end wrench. Make sure they are snug, but don’t over tighten. Also, before securing a loose machine head, turn the guitar over and visually make sure all the machine heads are aligned and one isn’t sitting at an odd angle. Some are tilted on purpose and it should be obvious as you observe them as a set.
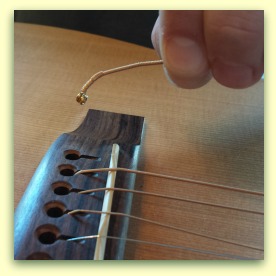
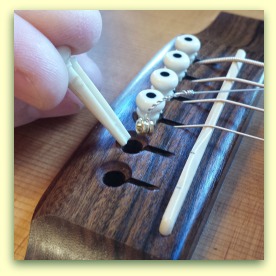 8. Open your strings and carefully unwind a string. I like to start with the largest, or low E. I put a little bend in the string right near the ball before slipping it into the bridge pin hole. Then push the bridge pin in with the string slot in the pin facing the headstock of the guitar. I chase the ball end into the hole with the pin while holding tension on the string until I feel it pop free of the bottom of the pin and slide up to the underside of the guitar face. That little bend in the string I advised helps in this process. Push the pin snugly downward.
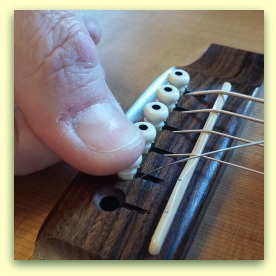 9. Install each string into the bridge until each is secured in place by a bridge pin. Remember that plastic bridge pins are susceptible to bending and cracking, especially the ones that have housed the larger strings. Plastic replacements are very inexpensive and should be considered if the old pins look worn out. More expensive pins can be purchased that are made from bone or hardwood. These are more resilient and are considered by some to aid in tone and sustain.
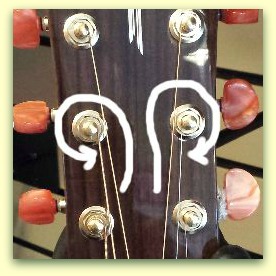 10. Feed the free end of the string through the hole in the machine head post. All strings go from the inside (from the center of the headstock) outward. On a standard acoustic guitar, the machine heads are arranged in a 3 x 3 pattern with 3 pointing out the left side of the headstock, and 3 pointing out the right. Thus, the three largest strings will wrap around the right side of each machine head (counterclockwise), and the three smaller will wrap around the left (clockwise).
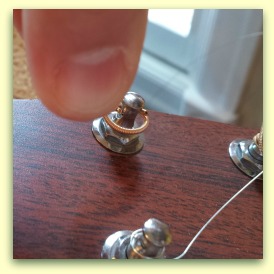
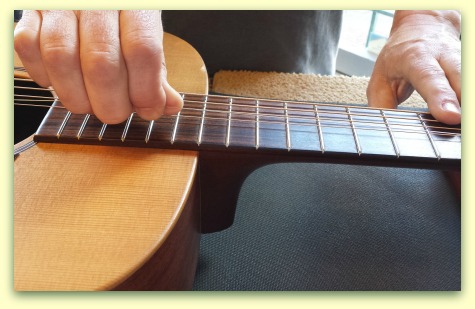
 11. Be careful not to kink the string until the correct length has been decided. Ideally, you want about 2 – 3 wraps on the post when the string is tuned to pitch. To keep consistency, I make sure the hole in the post is perpendicular to the neck and use a lifting of the string as pictured (<—) to about the height of a fist before kinking the string.
 Kinking in opposite directions on each side of the post helps against string slippage. Remember to kink the string in the direction that follows the direction you want to wrap the string!
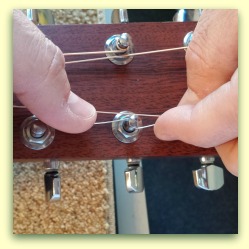
 12. After kinking the string, use one hand to both keep tension on the string (I lift up with a little finger), while using the forefinger to push the string down to ensure that the strings wraps downward on the post. Don’t push so hard that the string scratches the headstock face! Use the other hand to operate the string winder or to twist the machine head button by hand, winding the string on to the post. Just as the string slack as removed and it begins to tighten, make sure the string is sitting in the correct nut slot and is properly placed on the bridge saddle, directly in front of the bridge pin hole where it originates.
 13. Wind each string on to the proper post, bringing each up to pitch while checking with a tuner. If you are using a string winder, be careful to not wind too quickly as even a new string will break if the stretching is to abrupt. I like to clip each string after it is brought to pitch to keep floppy ends from getting in the way of the next string installation. Be careful not to clip another string along with the end you are cutting! We’ve all done this at least once and it may inspire you to recite words from the dark side of your vocabulary.
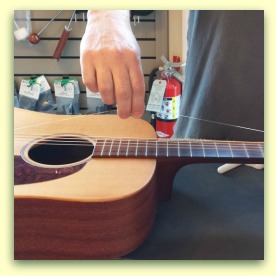
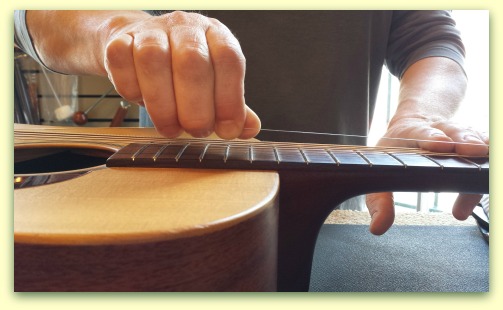
 14. After all the strings have been installed and brought to pitch, a gentle stretching of each string as pictured in will aid in getting the string to stay at pitch faster. This step is especially important if you bend strings a lot. It usually takes a few rounds of tuning to get all the strings to pitch as each added tension creates more relief on the neck, thus lowering the pitch of all the other strings.
 15. It’s ok to get the strings to pitch if you are working on the guitar in a neck cradle, but your final stretching and tuning should be done with the guitar in your lap and in playing position. All tuning, assessment, and intonation should always be done with the guitar in playing position.
Remember that guitar pitch is affected by changes in temperature and humidity so dont expect the tuning to remain on a fresh set of tuned strings.
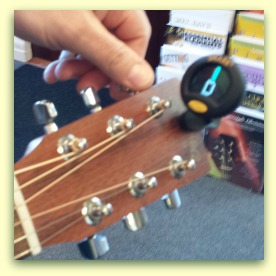 16. After a few tunings and a day or so, the guitar should settle in to a near constant tuning as long as it is not subjected to large changes. Headstock tuners are particularly handy as they are not affected by other sounds in the room….(like the drummer!)
Happy playing & thank you for supporting your local music store!